Customer registration and login
In the reservation system, it is possible to use two concepts of access to user login or. customers. The first concept is especially suitable for one-off events (concerts, performances, trainings, car repair shops, etc.), when it is not necessary and effective for the customer to have to create their user account and then log in to it. It is enough if they fill in their data within the booking form. In this case, it is a so-called reservation without registration. The second concept is based on a separate customer registration process and is especially suitable where the customer books repeatedly or uses credits (fitness centers, courses, beauty services, etc.). In this case, the customer is able to log in to his customer account on a specific booking page and have direct access to all his bookings. Both approaches can also be combined, so it is up to the customer whether he wants to book directly or creates his customer account for future reservations.
Settings - Reservation page - Reservation
By default, the registration of a customer account is linked to an e-mail address (which is verified in the registration process) and a password that the customer sets himself. As part of its user access, it can then manage and change its personal data. The user account can also store specific data that you can define yourself within your own data items (Customers - More - Custom data items). Of course, there is also the integration of GDPR consents, etc. If the customer is registered and the system is active possibility to use customer credit , then as part of his login he will learn about the current balance of the credit, its drawdown or he can buy it himself.
Alternative login
The standard way of registering and logging in customers, using an e-mail address and password, is available automatically in the reservation system. Nowadays, users / customers are often used to being able to register and log in to various websites and e-shops with their global accounts or, conversely, with their personal account within a specific organization. As the operators of the reservation site, you have the opportunity to offer your customers a connection to external services that ensure user authentication outside the reservation system. Typically, it is possible to log in using a Facebook account, a Google account and a MyID account. In the case of corporate user account management, it is a login using Single Sign On approaches, which allows the connection of the reservation system directly to the corporate infrastructure.
In all cases of alternate login, the user account is full. There is always a key e-mail address, according to which a standard user account will be created and this is possibly connected to alternative login services (always in connection with a specific e-mail address). For alternative login methods to work properly, it is usually necessary for the reservation page to be secured with the HTTPS protocol.
The information and procedures on this page require some expertise and experience. We recommend entrusting these settings to your web administrator or IT administrator!
The setting of these services is always specific and in relation to one reservation page, the identification of the application towards users is always specific, it is based on the specific subject of the reservation site operator and is not provided by the reservation system in general!
The possibility of activating and setting individual alternative login methods requires specific technical preparation. The registration and login options then take into account other settings within the way of registration and login in the reservation system.
The following procedures are performed only once and only apply to the settings and connection of the reservation system. These procedures do not directly affect your customers!
Settings - General settings - Alternative login
Login with Facebook account
Connection to the Facebook login service requires the creation of a so-called Facebook application via a developer account.
- If you do not have access to a developer account, create one within your personal Facebook account. The website https://developers.facebook.com/ will guide you through the registration itself.
- Create a new application within the developer account. You can select "Build connected experiences" as the application usage category.
- Name the application so that it makes sense to your customers (eg Login to the MojeFitness reservation system), this name will be visible when they approve the rights to access their Facebook account.
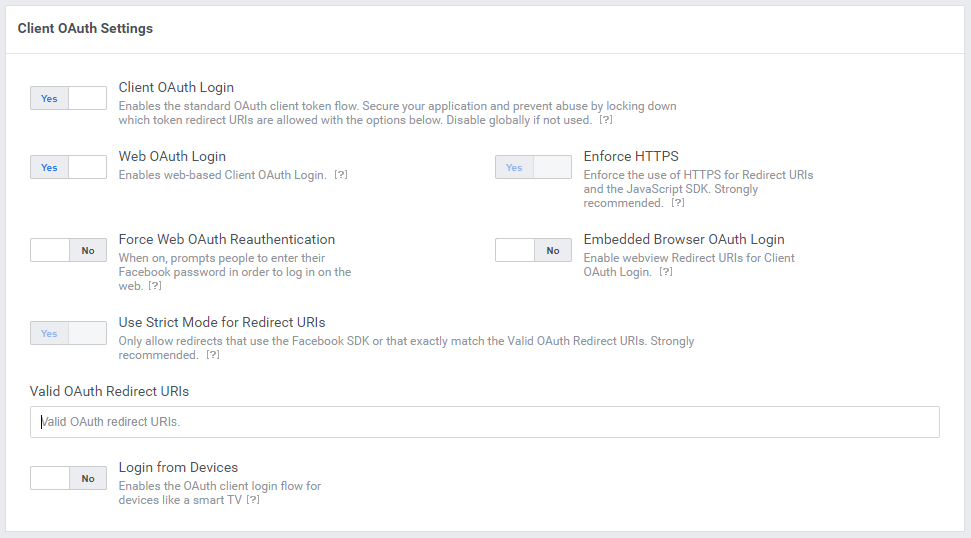
- After viewing the details of the newly created application, find Facebook Login in the selection and click on the "Set Up" button. Do not continue with the "Quickstart" process, but click on "Facebook Login - Settings" in the left menu.
- There is no need to change anything in the settings, just enter the URL for redirection, which you will get in the administration of the reservation system, in the field "Valid OAuth Redirect URIs". Do not fill in other fields. Save the settings.

- Then go to the main settings of the application "Settings - Basic". Here you will find the values App ID and APP Secret. Copy these values and paste them into the Facebook link settings in the reservation system administration. There, don't forget to also allow the use of Facebook logins.
- In the settings of the Facebook application, also set the domains "App domains", on which the reservation page is operated, typically neco.reenio.cz, mojerezervace.cz, etc. Also enter the link to the information on the processing of personal data "Privacy Policy URL ". The image "App Icon" will represent this application to end users, so it is advisable to choose, for example, your logo. Save changes.
- In the advanced settings of the application "" Settings - Advanced ", switch the item" "Allow API Access to App Settings" in the "Security" section to YES. Save changes.
- After saving, click on the "In development" switch at the top and follow the instructions to complete the setup. If everything is filled in and set correctly, the application will switch to the "Live" state.
By doing this, you have activated both sides of the process and the booking system is now able to authenticate customers by logging in to their Facebook account. In the administration of the Facebook application, you can monitor whether your customers use this service and other statistics.
Login with Google Account
Connecting to the Google sign-in service first requires verifying domain ownership through the Google Search Console. You also need a regular Google Account to manage the sign-in application.
- Sign in with your Google Account at https://console.developers.google.com/. Make sure you are really logged in with the account in which you want to manage the application, or switch (user icon in the upper right corner).
- Click on the "Create project" button in the upper right corner. If you already have some projects, select one of them or create another.
- Enter the name of the project under which you will manage the application (this name is internal only).
- After creating the project, the Dashboard of the project will be displayed. Now you need to click on the "Enable APIs and Services" button and then add API support to provide authentication. Find and enable Google + API.
- A page will appear with information and settings for the Google + API within your project. Click on the Google logo in the top bar to return to the full project summary page. Here, select the "OAuth consent screen" menu and select "External" and click the "Create" button.
- In this setup step, you need to enter the information that will be visible to customers when approving access to their login. Name the application so that it makes sense to your customers (eg logging in to the MojeFitness reservation system). It is also necessary, or. it is advisable to enter a contact e-mail address, application icon (logo), a link to information about the processing of personal data, etc. Save the changes and go through the next steps of the settings without the need to adjust the basic settings.
- Now select the menu "Credentials", click on the button "Create credentials" and select the option "OAuth client ID".
- Select "Web application" as the "Application type". In the section "Authorized redirect URIs" click on the button "Add URI" and enter the URL address for redirection, which you will get in the administration of the reservation system. Click the "Create" button.
- A window will now appear where you can find the Client ID and Client Secret values. Copy and paste these values into the Google link settings in the reservation system administration. Be sure to also allow the use of Google login.
Optionally, if you want to display your own specific information such as name or domain as part of the user's consent screen (otherwise the reenio domain information is displayed), it is necessary to perform the so-called application verification.
By doing this, you have activated both sides of the process, and the booking system is now able to authenticate customers by signing in to their Google account. In the Google project administration, you can monitor whether your customers use this service and other statistics.
Login with MyID
MyID login is based on OpenID technology. Similarly to the case of Facebook or Google login, for the correct connection of both systems, data are required for verification and security of communication by the reservation system (client ID and client's secret key). You can obtain this information from the operator of the MojeID service, after signing the contract and registering your subject (so-called client or endpoint). The reservation system supports the use of the MojeID service in the so-called Restricted Access mode.
- Learn about MyID login integration options (contractual documentation, technical documentation, etc.)
- Procedure for obtaining the necessary data and implementing the solutioní (reenio system uses integration using OpenID Connect technology, however, the implementation itself does not need to be solved, it is enough to obtain the necessary authentication data and connect both systems).